Lab 8: Build your own Block
After completing this lab, you will be able to:
- Abstract some functionality into an external application.
- Support run-time configurable multiple providers.
Third party modification:
- Try Paul Gieleon's refactorying Pull up Mathods to reduce code duplication when implementing your custom blocks
Scenario
WARNING: This is a code heavy lab.
Your reward for finishing this lab (or skipping to the end to
run the end solution) will be to have a Clippit™ like character
that knows when you are writing a letter.
This lab uses the String Resource Tool for localization,
which you have included under labs/setup
Please install this unless you have a newer or
Microsoft version. The newest version can always been found on
the Readify project distributor
Website.
In this lab, you will abstract some functionality into a new
application block. The steps to do this are:
[Exercise 1]
- Create an abstract client API and plugin API, using the provider model
- Create configuration data for the provider factory and a custom provider
- Create a provider factory derived from the Configuration Block ProviderFactory class
- Create a concrete provider by implementing the plugin API.
- Create design time configuration assembly for the provider factory configuration data and custom provider.
[Exercise 2]
- Create configuration data for the included providers.
- Create design time configuration classes for the included providers.
[Exercise 3]
- Implement external providers in a separate assembly.
Other steps that would typically occur, which you won't cover in
this lab:
- Build unit tests for the providers in the block.
- Document all the classes in the block (and integrate with VS.NET).
Estimated Time To Complete this lab: 60 minutes.
 Exercise 1: Review Current Application
First step
- Open the Ex01.sln file, and build the solution.
Run the application
- dear sir,thank you for your interest in patterns, you hope you enjoy Enterprise Library.yours sincerely,p&p team
Review the Application code
Exercise 2: Create a Notification Block
Exercise 2: Create a
Notification Block in wizard format
First step
- Open the Ex02.sln file, and build the solution.
Create the abstract API
/// Interface exposed by any provider that supports notification
/// </summary>
public interface INotificationProvider : IConfigurationProvider
{
/// <summary>
/// Display a message to the user.
/// This method must not block execution, so if the message display
/// will take any length of time, it should occur asynchronously.
/// </summary>
/// <param name="parent">The parent form to use when displaying the message</param>
/// <param name="message">The message to display to the user</param>
void DisplayMessage(Form parent, string message);
}
Create the configuration data for the block
- [XmlRoot("notificationSettings", Namespace=NotificationSettings.ConfigurationNamespace)]
public class NotificationSettings
{
public const string ConfigurationNamespace = "http://www.fourthcoffee.com/framework/03-01-2005/notification";public const string SectionName = "notificationConfiguration";
} - private NotificationProviderDataCollection _notificationProviders = new NotificationProviderDataCollection();
private string _defaultNotificationProviderName = null;[XmlArray(ElementName="notificationProviders")]
[XmlArrayItem(ElementName="notificationProvider", Type=typeof(NotificationProviderData))]
public NotificationProviderDataCollection NotificationProviders
{
get { return _notificationProviders; }
}[XmlAttribute("defaultProviderName")]public string DefaultNotificationProviderName
{
get { return _defaultNotificationProviderName; }
set { _defaultNotificationProviderName = value; }
}The NotificationProviders property provides the data for the configured notification providers. Note that the type of the property should derive from ProviderDataCollection (defined in the Configuration assembly), to support some of the design time functionality (as you shall show later).The DefaultNotificationProviderName property will be used to allow the client of the block to not specify a provider name, and use a default specified in configuration.The Xml* attributes are being used to customize the saved XML. - Open the NotificationProviderData.cs file, and implement the NotificationProviderData class. This will contain the base class that all the configuration for the providers will derive from. This class is used for two purposes:
- To contain any common configuration data that all providers use. In this case you do not have any common configuration settings for all our providers (apart from Name and Type, which are defined in the ProviderData base class).
- This is also the location where you can add static XmlInclude attributes that will allow the XmlSerializer to de-serialize derived classes. Of course, you can only add XmlInclude attributes for classes in this assembly. You will see in the next exercise how to include additional classes for externally defined providers.
public abstract class NotificationProviderData : ProviderData
{
} - [XmlRoot("notificationProvider", Namespace=NotificationSettings.ConfigurationNamespace)]
public class CustomNotificationData : NotificationProviderData
{
private string _typeName;
private NameValueItemCollection _attributes = new NameValueItemCollection();[XmlAttribute("type")]
public override string TypeName
{
get { return _typeName; }
set { _typeName = value; }
}[XmlElement("Attributes")]
public NameValueItemCollection Attributes
{
get { return this._attributes; }
}
} - public class NotificationProviderDataCollection : ProviderDataCollection
{
public NotificationProviderData this[int index]
{
get { return (NotificationProviderData) GetProvider(index); }
set { SetProvider(index, value); }
}public NotificationProviderData this[string name]
{
get { return (NotificationProviderData) GetProvider(name); }
set { SetProvider(name, value); }
}public void Add(NotificationProviderData providerData)
{
AddProvider(providerData);
}
}
Create the configuration view
- public class NotificationConfigurationView : ConfigurationView
{
public NotificationConfigurationView(ConfigurationContext context) : base(context)
{}public virtual NotificationSettings GetNotificationSettings()
{
return (NotificationSettings) ConfigurationContext.GetConfiguration(NotificationSettings.SectionName);
}public virtual NotificationProviderData GetNotificationProviderData(string providerName)
{
ArgumentValidation.CheckForNullReference(providerName, "sinkName");
ArgumentValidation.CheckForEmptyString(providerName, "sinkName");NotificationSettings settings = GetNotificationSettings();
NotificationProviderData sinkData = settings.NotificationProviders[providerName];
if (null == sinkData)
{
throw new ConfigurationException(SR.NoSuchProviderDefined(providerName));
}
return sinkData;
}
}
Create the notification provider factory
- public class NotificationProviderFactory : ProviderFactory
{
public NotificationProviderFactory() : this(ConfigurationManager.GetCurrentContext())
{}public NotificationProviderFactory(ConfigurationContext configurationContext) :
base(SR.HandlerFactoryName, configurationContext, typeof(INotificationProvider))
{}private NotificationConfigurationView GetConfigurationView()
{
return new NotificationConfigurationView(this.ConfigurationContext);
}// TODO: Implement protected overloads to provide type information// TODO: Implement strongly-typed creation methods} - protected override ConfigurationView CreateConfigurationView()
{
return GetConfigurationView();
}protected override string GetDefaultInstanceName()
{
return GetConfigurationView().GetNotificationSettings().DefaultNotificationProviderName;
}protected override Type GetConfigurationType(string configurationName)
{
string typeName = GetConfigurationView().GetNotificationProviderData(configurationName).TypeName;
return base.GetType(typeName);
} - public INotificationProvider GetNotificationProvider()
{
return (INotificationProvider) base.CreateDefaultInstance();
}public INotificationProvider GetNotificationProvider(string providerName)
{
return (INotificationProvider) base.CreateInstance(providerName);
}
Create a static Factory class for
one-line creation of providers
- public sealed class NotificationFactory
{
private NotificationFactory()
{
}public static INotificationProvider GetNotificationProvider()
{
NotificationProviderFactory factory = new NotificationProviderFactory();
return factory.GetNotificationProvider();
}public static INotificationProvider GetNotificationProvider(string providerName)
{
NotificationProviderFactory factory = new NotificationProviderFactory();
return factory.GetNotificationProvider(providerName);
}
}
Implement a weakly typed provider
- public class StatusBarNotificationProvider : ConfigurationProvider, INotificationProvider
- NotificationConfigurationView config = null;public override void Initialize(ConfigurationView configurationView)
{
ArgumentValidation.CheckExpectedType(configurationView, typeof(NotificationConfigurationView));
config = (NotificationConfigurationView) configurationView;
} - public void DisplayMessage(Form parent, string message)
{// Default display timeout
int displayTimeout = 2000;CustomNotificationData configData =
(CustomNotificationData)config.GetNotificationProviderData(ConfigurationName);if (configData.Attributes.GetNameValueItem("DisplayTimeout") != null)
{
displayTimeout = int.Parse(configData.Attributes.GetNameValueItem("DisplayTimeout").Value);
}StatusBar bar = SearchForStatusBar(parent);StatusBarManager manager = new StatusBarManager(bar);
manager.Display(message, displayTimeout);
}
Add design time support
- [Image(typeof(NotificationProviderNode))]
public abstract class NotificationProviderNode : ConfigurationNode
{
[Browsable(false)]
public abstract NotificationProviderData NotificationProviderData
{
get;
}protected override void OnSited()
{
base.OnSited();
Site.Name = NotificationProviderData.Name;
}protected override void OnRenamed(ConfigurationNodeChangedEventArgs e)
{
base.OnRenamed (e);
NotificationProviderData.Name = e.Node.Name;
}
}This class is abstract, as each of the provider types (at this point there is only the Custom Notification Provider), will have their own concrete xyzNode class that is used to manipulate their data.The Image tag is used to provide the bitmap that will be displayed in the tree. In this case, a bitmap named NotificationProviderNode.bmp should be in the project as an embedded resource.The OnSited and OnRenamed methods are use to pull and push the Name information from/to the underlying NotificationProviderData instance (which is provided by the concrete xyzNode class). - public class CustomNotificationProviderNode : NotificationProviderNode
{
private CustomNotificationData customNotificationData;
public override NotificationProviderData NotificationProviderData
{
get
{
return customNotificationData;
}
}// Initializes node with default data.
public CustomNotificationProviderNode()
{
this.customNotificationData = new CustomNotificationData();
this.customNotificationData.Name = SR.DefaultCustomNotificationProviderNodeName;
}// Initializes node with loaded data.
public CustomNotificationProviderNode(CustomNotificationData customNotificationData)
{
this.customNotificationData = customNotificationData;
}
// TODO: Add properties that provide design-time access to configuration class} - [SRDescription(SR.Keys.NotificationProviderAdditionalPropertiesDescription)]
[SRCategory(SR.Keys.CategoryGeneral)]
public NameValueItemCollection Attributes
{
get { return customNotificationData.Attributes; }
}The SRDescription and SRCategory attributes are attribute classes that use resources to specify the Description and Category at runtime of the particular property in the property grid. This is used to support localization.The SR class is code-generated from the SR.strings file, which is also located in the same project. The Custom Tool that is used to generate the strongly-typed resource class can be downloaded from the link at the top of this lab.
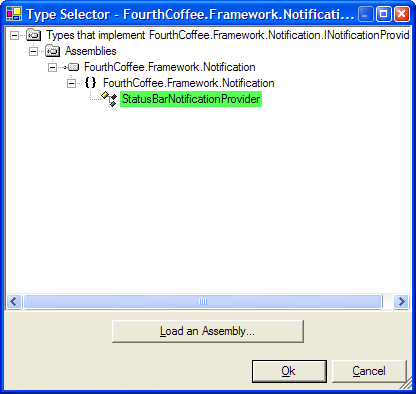
[Editor(typeof(TypeSelectorEditor), typeof(UITypeEditor))]
[BaseType(typeof(INotificationProvider))]
[SRDescription(SR.Keys.NotificationProviderTypeDescription)]
[SRCategory(SR.Keys.CategoryGeneral)]
public virtual string TypeName
{
get { return customNotificationData.TypeName; }
set { customNotificationData.TypeName = value; }
}This property uses the EditorAttribute (from System.ComponentModel) to specify the editor to use when displaying this property in the property grid. In this case, the editor is the Enterprise Library type selection dialog, which uses the BaseType attribute to filter the types available.The Required attribute (from the Configuration block) is used by Configuration Block validation to ensure that the property has been set before the user can save the configuration in the console.- [Image(typeof (NotificationSettingsNode))]
public class NotificationSettingsNode : ConfigurationNode
{
private NotificationSettings notificationSettings;public NotificationSettingsNode() : this(new NotificationSettings())
{}public NotificationSettingsNode(NotificationSettings notificationSettings)
{
this.notificationSettings = notificationSettings;
}/// <summary>
/// The configured name.
/// </summary>
[ReadOnly(true)]
public override string Name
{
get
{
return base.Name;
}
set
{
base.Name = value;
}
}/// <summary>
/// Retrieves configuration data based on the current state of the node.
/// </summary>
/// <returns>Configuration data for this node.</returns>
[Browsable(false)]
public virtual NotificationSettings NotificationSettings
{
get
{
notificationSettings.NotificationProviders.Clear();
foreach (NotificationProviderNode node in this.Nodes)
{
notificationSettings.NotificationProviders.Add(node.NotificationProviderData);
}
return notificationSettings;
}
}
} - protected override void OnSited()
{
base.OnSited ();
Site.Name = SR.DefaultNotificationSettingsNodeName;
CreateDynamicNodes(notificationSettings.NotificationProviders);
}protected override void OnAddMenuItems()
{
base.OnAddMenuItems ();
CreateDynamicMenuItems(typeof(NotificationProviderNode));
}The CreateDynamicNodes call will iterate through the NotificationProviders collection, and create nodes of the appropriate type based on the type of the instance of the object in that collection. The mapping from configuration data type to node data type is performed within a ConfigurationDesignManager (as you will do later).CreateDynamicMenuItems, similarly, will iterate through any registered node types that are derived from the given type, and create menu items for them. - You need to add a property to this class to allow the user to select a default notification provider. Once selected, you need to ensure that the name of the provider stored within the NotificationSettings class always matches the name of the provider within its own NotificationProviderData class. You also need to take care of the case where the user selects a provider as the default, and then deletes it. Unfortunately, there is no succinct way of doing this, and so the following code is quite complex. In future versions of Enterprise Library, there may be a shortcut way of implementing it.Add the following code to the NotificationSettingsNode class:NotificationProviderNode defaultNotificationProviderNode = null;[Editor(typeof(ReferenceEditor), typeof(UITypeEditor))]
[ReferenceType(typeof(NotificationProviderNode))]
[SRCategory(SR.Keys.CategoryGeneral)]
[SRDescription(SR.Keys.DefaultProviderDescription)]
public NotificationProviderNode DefaultNotificationInstance
{
get { return defaultNotificationProviderNode; }
set
{
ILinkNodeService service = GetService(typeof(ILinkNodeService)) as ILinkNodeService;
Debug.Assert(service != null, "Could not get the ILinkNodeService");
defaultNotificationProviderNode = (NotificationProviderNode)service.CreateReference(
defaultNotificationProviderNode,
value,
new ConfigurationNodeChangedEventHandler(OnNotificationDefaultProviderRemoved),
new ConfigurationNodeChangedEventHandler(OnNotificationDefaultProviderRenamed));
this.notificationSettings.DefaultNotificationProviderName = (defaultNotificationProviderNode != null) ? this.defaultNotificationProviderNode.Name : string.Empty;
}
}private void OnNotificationDefaultProviderRenamed(object sender, ConfigurationNodeChangedEventArgs args)
{
this.notificationSettings.DefaultNotificationProviderName = (defaultNotificationProviderNode != null) ? this.defaultNotificationProviderNode.Name : string.Empty;
}private void OnNotificationDefaultProviderRemoved(object sender, ConfigurationNodeChangedEventArgs args)
{
this.defaultNotificationProviderNode = null;
}private void ResolveDefaultNotificationNode()
{
if ((notificationSettings.DefaultNotificationProviderName == null) || (notificationSettings.DefaultNotificationProviderName.Length == 0)) return;
DefaultNotificationInstance = Hierarchy.FindNodeByName(this, notificationSettings.DefaultNotificationProviderName) as NotificationProviderNode;
}public override void ResolveNodeReferences()
{
base.ResolveNodeReferences ();
ResolveDefaultNotificationNode();
} - The last class you need to implement is called a Configuration Design Manager. It is responsible for loading the configuration into the designer, registering node types and XML includes, and saving the configuration.Open NotificationConfigurationDesignManager.cs, and un-comment the NotificationConfigurationDesignManager class.The CreateCommands method is responsible for adding the new notification section menu item to the root node of the application in the console.The RegisterNodeTypes method is responsible for registering settings and provider node types, which allow the dynamic menu item creation to work.
- Finally, in order for the configuration console to use the Configuration Design Manager you created, you need to put the assembly in the same directory as the configuration console, and use an assembly attribute to provide the type of the design manager.You have already changed the build directory to be the Enterprise Library bin directory (you can check in the project properties window).Open the AssemblyInfo.cs file in the Notification.Configuration.Design project, and add the following attribute at the bottom:
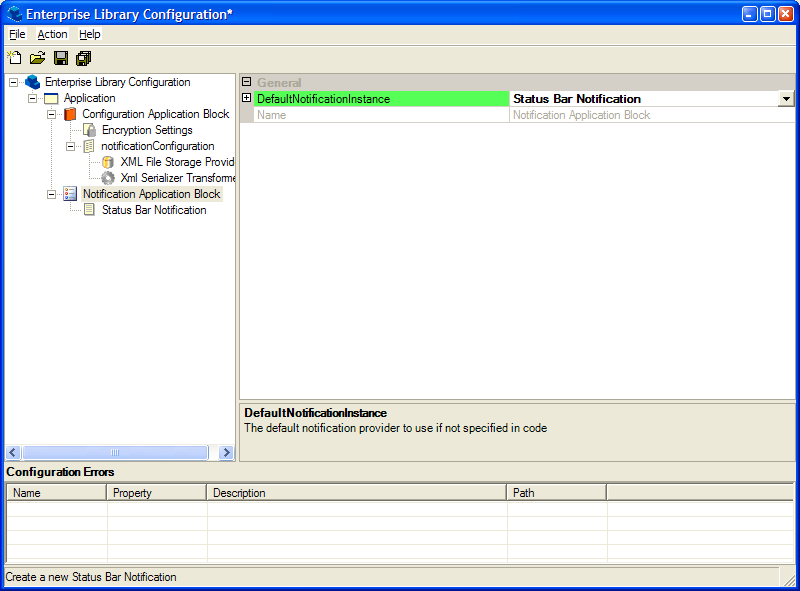
Run the configuration console

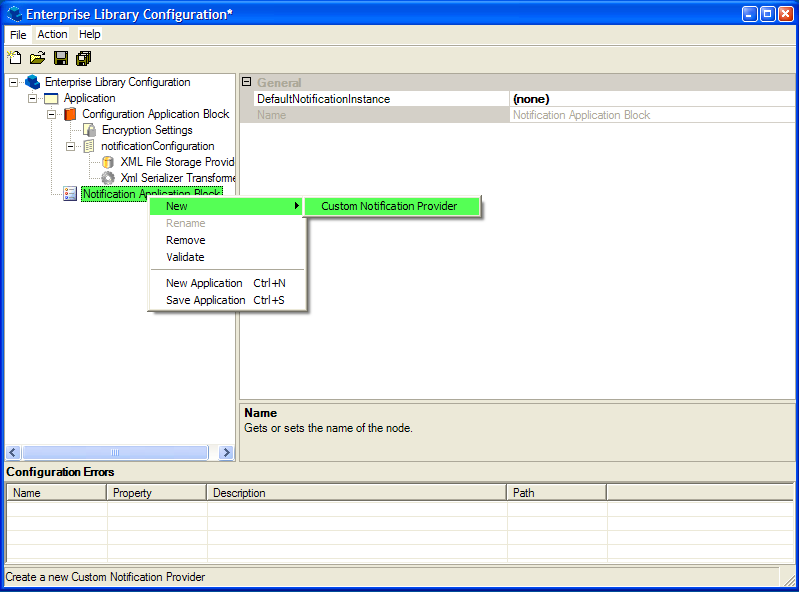
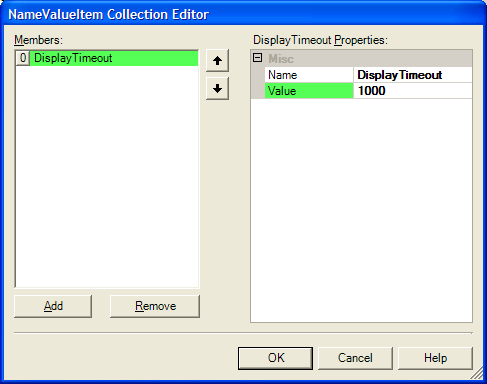 Name: DisplayTimeoutValue: 3000
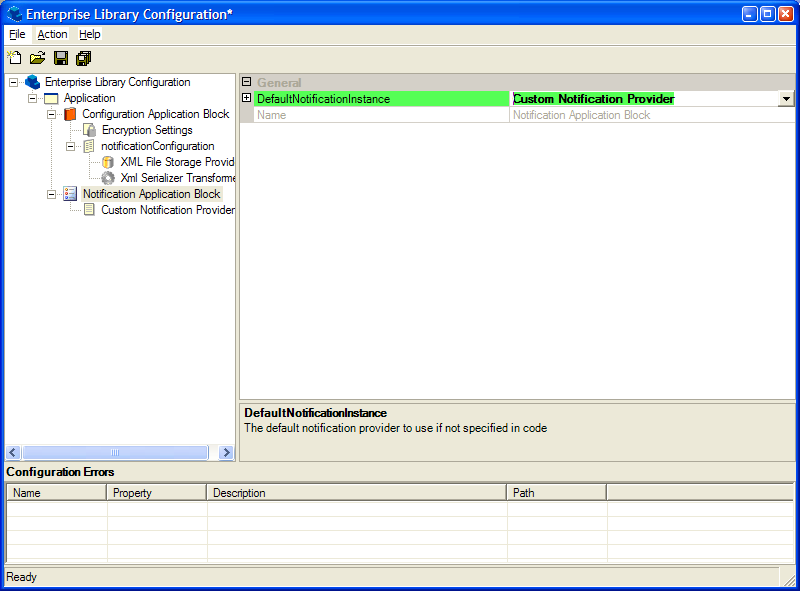
Change the client application
- You have already created post-build steps, and added the required references and using statements.Within the EditorApplication project, right-click over the EditorForm.cs file and select View Code.Change the DisplayNotification method to (modified code in bold):
{
try
{
INotificationProvider provider = NotificationFactory.GetNotificationProvider();
provider.DisplayMessage(this, description);
}
catch (Exception ex)
{
MessageBox.Show(ex.ToString());
}
}
Run the application
- dear sir,thank you for your interest in patterns, you hope you enjoy Enterprise Library.yours sincerely,p&p team
To check the finished solution labs\cs\Build Your Own Block\exercises\ex02\end\Ex02.sln
Exercise 3: Add strongly typed configuration data
First step
- Open the labs\exercises\ex03\begin\Ex03.sln file, and build the solution.
Add run-time configuration
- Open the new file StatusBarNotificationData.cs, which is in the Configuration folder of the Notification project.Implement the StatusBarNotificationData class with the following code:[XmlRoot("notificationProvider", Namespace=NotificationSettings.ConfigurationNamespace)]
public class StatusBarNotificationData : NotificationProviderData
{
[XmlIgnore]
public override string TypeName
{
get { return typeof(StatusBarNotificationProvider).AssemblyQualifiedName; }
set { }
}int _displayTimeout = 2000;[XmlElement("displayTimeout")]public int DisplayTimeout
{
get { return _displayTimeout; }
set { _displayTimeout = value; }
}
}The XmlRoot attribute is required to ensure that the namespace of the class is set, for the same reasons as the CustomNotificationData above.The XmlIgnore attribute is used because the type of the provider does not need to be serialized, as it will always be the same. (The TypeName property is used at runtime by the notification provider factory to specify the concrete type of the provider).The DisplayTimeout property will contain the timeout in ms, with a default of 2000 ms.
[XmlInclude(typeof(StatusBarNotificationData))]
public abstract class NotificationProviderData : ProviderData
{
}- public void DisplayMessage(Form parent, string message)
{
StatusBarNotificationData configData =
(StatusBarNotificationData)config.GetNotificationProviderData(ConfigurationName);int displayTimeout = configData.DisplayTimeout;StatusBar bar = SearchForStatusBar(parent);StatusBarManager manager = new StatusBarManager(bar);
manager.Display(message, displayTimeout);
}
Add design time configuration support
- public class StatusBarNotificationNode : NotificationProviderNode
{
private StatusBarNotificationData statusBarNotificationData;
public override NotificationProviderData NotificationProviderData
{
get
{
return statusBarNotificationData;
}
}public StatusBarNotificationNode()
{
this.statusBarNotificationData = new StatusBarNotificationData();
this.statusBarNotificationData.Name = SR.DefaultSatusBarNotificationNodeName;
}public StatusBarNotificationNode(StatusBarNotificationData statusBarNotificationData)
{
this.statusBarNotificationData = statusBarNotificationData;
}[SRCategory(SR.Keys.CategoryBehavior)]
[SRDescription(SR.Keys.StatusBarTimoutDescription)]
public int DisplayTimeout
{
get { return statusBarNotificationData.DisplayTimeout;}
set { statusBarNotificationData.DisplayTimeout = value; }
}
}In order to implement the design time support, the Provider Node class must:- Supply the configuration data instance that contains the Name to its base class
- Provide constructors for a new instance (adding a new provider), and for loading from a configuration file.
- Provide properties for each of the data properties that should be exposed, along with optional design time attributes.
- private static void RegisterNodeTypes(IServiceProvider serviceProvider)
{
INodeCreationService nodeCreationService = ServiceHelper.GetNodeCreationService(serviceProvider);Type nodeType = typeof(CustomNotificationProviderNode);
NodeCreationEntry entry = NodeCreationEntry.CreateNodeCreationEntryWithMultiples(new AddChildNodeCommand(serviceProvider, nodeType), nodeType, typeof(CustomNotificationData), SR.DefaultCustomNotificationProviderNodeName);
nodeCreationService.AddNodeCreationEntry(entry);nodeType = typeof(StatusBarNotificationNode);
entry = NodeCreationEntry.CreateNodeCreationEntryWithMultiples(new AddChildNodeCommand(serviceProvider, nodeType), nodeType, typeof(StatusBarNotificationData), SR.DefaultSatusBarNotificationNodeName);
nodeCreationService.AddNodeCreationEntry(entry);
}
Build and Configure
To check the finished solution labs/cs/Build%20Your%20Own%20Block/exercises/ex03/end/Ex03.sln
Exercise 4: Add external providers
First step
- Open the labs\exercises\ex04\begin\Ex04.sln Ex04.sln file, and build the solution.
Review the extended providers
- In the Notification.Extended project are two new providers, one to scroll the message in the forms title bar, the other uses the Microsoft Agent technology to display the messages.
View the registration code for the external
providers
- The one difference when creating providers in external assemblies, compared to what you did with the status bar notification provider, is managing the XML serialization.With providers defined in external assemblies, it is necessary to tell the configuration console to include those types used within the configuration for XML Serialization. This is done in the Configuration Design Manager.Open the file ConfigurationDesignManager.cs within the Notification.Extended.Configuration.Design project.The following code in RegisterXmlIncludeTypes method registers the types for Xml inclusion:private static void RegisterXmlIncludeTypes(IServiceProvider serviceProvider)
{
IXmlIncludeTypeService xmlIncludeTypeService = serviceProvider.GetService(typeof(IXmlIncludeTypeService)) as IXmlIncludeTypeService;
xmlIncludeTypeService.AddXmlIncludeType(NotificationSettings.SectionName, typeof(FormTitleNotificationData));
xmlIncludeTypeService.AddXmlIncludeType(NotificationSettings.SectionName, typeof(AgentNotificationData));
}
Configure the application
Add a reference to the extended notification
assembly from the application
Run the application
- Change the default provider, save, wait up to fifteen seconds, and then type some more magic words (see SmartWords.txt in the EditorApplication project for the list). You will see the new provider setting used. You can even change the agent that is being used on the fly, by selecting a new agent file.If you have Microsoft office installed, you can even use Clippit, which can be found in a directory like <Program Files>\Microsoft Office\OFFICE11.